The chain is the main part of the bike drivetrain assembly. Passing through the sprocket teeth, the chain transfers torque to the rear wheel. This explains why the bike is moving. The dynamic loads on the unit are large enough, therefore, during operation, the chain mechanism is worn out. In this article, we will look at how to remove the chain from the bike and how to put it back.
 The working resource of the singlespeed chain mechanism is designed for the entire life of the bike. The cycle runs smoothly, without deviating. The situation is somewhat more complicated with the bikes, designed for several speeds. The load on the chain mechanism is greater in relation to parallel gears because the bike chain is angled with respect to the bike frame. Compared to parallel transmission, the impact on the links is several times greater. To avoid damage to the entire transmission mechanism, the chain must be timely replaced.
Do not think that you cannot remove the bike chain from a single speed bike. It is removed in order to be cleaned or repaired.
When do you need to remove the chain from the bike
 Let's figure out how to know if the chain assembly of a multi-speed bike is faulty. You can estimate the mileage of a two-wheeler, but other factors also affect the health of the cycle.
- Correctness of gear selection;
- Road quality;
- Riding speed.
 The appearance of suspicious sounds (provided that the lubrication is in order) and difficulty shifting gears are the first signs of a chain assembly malfunction. The simplest way link health estimates are as follows:
- Peel back the bike chain from the largest sprocket;
- If it leaves freely from 3 or more teeth, then the bicycle chain must be replaced. Two prongs are a kind of warning. You can still travel for some time, but it will have to be removed soon.
The same method works for single speed bicycles as well.
An informative method is measuring the length of the bike chain.
- 30.5 cm is the best length;
- 30.6-30.8 cm - medium wear, high maintainability;
- More than 30.8 cm - links and sprockets are badly worn. The entire transmission is damaged.
To correctly measure the relative elongation, the chain must be completely removed from the bike.
Types of bike chains
Consider the 2 main types of bicycle chains:
- Lock;
- Solid.
 Its peculiarity is that it has a special clamping device. Removing one from the stars, as well as putting it back on, is easy. To do this, you just need to disconnect the lock.
The location of the detachable link can be determined by visual inspection. If the links are clean, it is not difficult to find the connector. As a rule, the manufacturer's brand is stamped on the connector.
Solid
It is impossible to completely remove such a cycle. When completely removed from the sprockets, it simply hangs on the frame. Of course, the solid construction is less convenient compared to the version with a lock. However, there are also advantages. The lock may loosen, the connecting plier may be lost. The links are disengaged. There are no such problems with a continuous chain. If it breaks, then this is exclusively a quality cost.
 This is not difficult. Follow the algorithm.
- Pry the clip with a screwdriver or knitting needle. It is important not to break the clamp, since it will not be possible to connect everything back without it;
- Disengage the link.
Now you can freely remove the bike chain and perform the necessary manipulations over it: shorten, clean or, if it is hopelessly damaged, throw it away.
To disconnect a solid structure, you will need a special tool called a squeeze. Using this device will allow you to remove the link without damaging it. The algorithm is as follows.
- Select the link to be disassembled;
- Place the bicycle chain in the position for pressing out and pressing in the link axle, or pin;
- Tighten the screw and pull the axle towards you.
You do not need to completely pull the pin out as it will not be easy to insert it back into place. Squeeze manipulation loosen the axis somewhat. Select another link to re-decouple. Press in the axle in the reverse order.
- Connect adjacent links together;
- Press in the pin with the screw.
Bicycle chain repair
 The most common defect in a bicycle chain is sagging due to increased length. Of course, you can remove the stretched bike chain and replace it with a new one, but you can try and restore it. Due to the loosening of the axles, the bicycle chain expands in the transverse and longitudinal directions. It is impossible to eliminate the transverse expansion, but with the longitudinal expansion, it is possible that something will work out.
It is necessary to remove the extra links in such a way that the bicycle chain passes freely, without excessive tension, along the large sprocket. Also use a squeeze when shortening. It is important here not to overdo it by pulling out the extra links.
The installation of so-called stabilizers on the bike helps, which does not allow the chain to fly off the sprocket when riding. Of course, if you put a pacifier as a temporary measure is a good solution, but you must not forget about replacing the bike chain.
 Putting a bike chain on a singlespield is quite simple:
- Hang the bike chain on both sprockets;
- Snap the lock (alternatively, press in the pin).
A high-speed bike will take a little longer.
Shortening the chain is usually required when sagging - after long use, heavy load or when changing the set of sprockets. How to shorten a bicycle chain and how to determine the correct length?
It's simple:
- Switch to the largest stars in the front and back.
- We open one link of the chain.
- We tighten the chain as much as possible so that the support is in a horizontal position.
- Add one pair of links and get the desired length.
In many shops, when buying a bicycle chain, a service is provided for its fitting - if you use it, usually the technicians have both the tool and the proper experience.
Tool
Internet experts and connoisseurs of Soviet tales usually recommend a nail and a stone, but progress does not stand still and it is better to purchase a chain squeeze (chaintool) - a simple tool that resembles a child's vice without a bed, which can be purchased for 500-1000 rubles.
It makes sense to keep the squeeze in a backpack only during difficult multi-day hikes, usually this is a workshop tool, so when choosing, you should not pay attention to light versions and squeezes in multitools - they are usually unreliable and are thrown away after 5-10 uses.
If there is no squeeze nearby, a hammer, a couple of nuts and a nail will help, but more on that later.
Sequencing
Consider how to shorten the Gall bike chain (this is what is used by 95-99% of all modern bicycles).
Disconnect
- Install the squeeze so that its core is exactly in the center of the pin (roller).
- Smoothly rotate the squeeze handle until the roller comes out to the level of the second inner plate.
- Disconnect the link without removing the pin to the end.
Removing unnecessary links
- We fix the required length and determine the pin for squeezing, taking into account that the released link plates coincide with the plates of the already squeezed one.
- We repeat the sequence from item # 1, completely squeezing the roller.
Connect
We bring the chain down and carefully, centering the squeeze at the start and controlling the process every 0.2-0.3 mm, press the pin into the link released in p. 2.
Some people prefer - in this case, before connecting, you should check if it is threaded into the switches.
We check the performance
- The pressed roller itself. If there are squeaks or problems with mobility on the link, set the plates in place, bending the chain along the plane of the link until the clicks stop, there is enough hand strength, no tool is required.
- The whole shortened chain. We try to make a few turns on the smallest stars - if there are problems, it will be noticeable right away.
For a repeating type chain (half-link, with one pair of repeating plates), the process is simplified, there is no need to choose a pairing. Shorten the chain of lightweight models and some sports options can only be done with a specialized tool, and the shortening procedure is described in the proprietary documentation.
Features of work in the absence of squeeze
Lack of squeeze is not a problem either. Instead of squeezing, a pin is enough - a nail, a drill, a dowel, slightly smaller than a roller in diameter, and a hammer with which this pin will knock out the pin. The main thing is the accuracy of the actions, it is important that the blows do not bend the link plates - for this, a nut or other amplifier is laid under the chain and inside the link.
If shortening without squeezing will be done for the first time, it is recommended to practice on an unused link, since the work will require skill. In addition, without squeezing the chain, in any case, you will have to remove the chain from the bike, since you will need a solid support.
How to replace a chain on a bicycle with speeds - instructions + video
Any vehicle needs maintenance. Bicycles are not exempt. Their key element in the transmission unit is the chain. High-speed bicycles have a lot of finickyness to function properly. The frequency of chain replacement or maintenance is largely determined by the riding style. For example, trial cycling lovers do this while riding. When and how the chain changes to speed bike?
What you need to know about the types of bicycle chains?
Bicycle chains come in two types: lock and solid. Disconnecting the lock variation is not difficult. It is convenient to do this with a regular thread (wire), threading it into adjacent links (before and in front of the lock) and tightening the loop. The main thing is to avoid damaging the lock and not lose it.
Opening a continuous chain is possible only with a special squeeze, although the procedure itself also cannot be classified as complex tasks:
- It will be necessary to install the chain in the position of pressing out-pressing the axle.
- Tightening the screw to pull out the pin.

Axial pressing is inherent in the opposite sequence: connecting the links and pressing the pin by means of a screw.
Note ... The use of the squeeze is accompanied by loosening of the axle, therefore, repeating the release is the lot of another link.
What tools are important to have to replace the chain:
- The key with which the rear wheel is removed.
- Pliers to hold the segments and pin.
- Squeeze. As noted above, this device is used to press out and press in the pins.
Chain removal procedure in standard variation - step by step instructions
Cyclists who do not have sufficient experience in such matters are advised to memorize the general scheme, reflecting the location of the chain on the system, cassette, switches. Then the procedure for its subsequent installation will not cause difficulties.
As soon as all the nuances are fixed in memory (or on paper), you can proceed to further steps:
- Cleaning links from dirt accumulations. If this is not done, dirt will be a significant obstacle to the next steps.
- Removing the rear wheel. The absence of this detail simplifies all actions, although experienced craftsmen safely skip this stage. In fact, it does not apply to mandatory measures.
- Extrusion of the pin present in all links (the metal cylinder that closes the link). This is where pomace is used.
- Separation of one link.
- Withdrawing the extreme links from the switch system.
At this point, the removal of the chain (worn out or requiring cleaning) can be considered complete. The procedure itself is quite easy with the tool and basic knowledge. Accuracy of execution and the absence of forceful actions during the pressing process are very important.
Step-by-step installation process bicycle chain in the form of instructions
With bicycles that have one gear (singlespeeds), everything is limited to a chain canopy on a star-shaped part and a locking snap-in or pressing in a pin. The design of high-speed bike bikes suggests some difficulties in this issue.

They can be designated by the following points:
- Locking derailleurs on small transmission stars.
- Next, a chain is put on the teeth of the stars. In this case, it is important to take into account the location of the rollers involved in its tension.
- Then the chain links are aligned.
- The chain is clamped and the axle is pressed in or the lock is closed.
At the final stage, the move is checked. For this purpose, the pedals are rotated. Incorrect installation is characterized by sagging of the installed element and difficult twisting. If this is not observed, the installation of the chain is done according to all the rules.
In what cases, besides wear, the chain is removed:
- For deep cleaning when it is necessary to remove lubricant and accumulated abrasive.
- To replace damaged links.
How is chain wear determined?
A failed chain stretches, its links shift, harming the sprockets, which negatively affects the switches. It is quite difficult to visually determine the degree of wear.
After using the bike for a long time without maintenance, the chain often begins to sag. How to shorten your bike chain at home? What is required to determine the correct length? We will look for answers to these and other questions in the presented material.
What factors affect bike chain lengthening?
A number of factors lead to wear of the axles, the so-called pins, of the bicycle chain. Firstly, deposits in the form of old oil accumulate between the structural elements, on which dust and small impurities adhere. In addition, stretching can cause the chain to be pulled when climbing steep climbs on the bike. Another reason is the end of the chain's service life, the destruction of its elements as a result of impacts, metal corrosion. To avoid discomfort during the operation of the bike, you need to figure out
It's fantastic for keeping the momentum going as you change. Do you remember that in the "old days" it was not only good shapebut also at that time absolutely necessary to loosen the pedals if we wanted the darning chain to grip beautifully the best sprocket for this hill we tackled. All of your motive power is satisfied by this basic fence. When you park the chain on the closer secondary fence, you can see the space behind the far side flap: this allows the cymbals to flash off center from the rollers \u003d good free link.
How to determine the optimal length?
Before figuring out whether you can shorten the chain on a bicycle with your own hands, you need to find out how long it should have for comfortable movement. To understand this issue, it is enough to throw the chain over the largest chainrings in both the rear and front chassis of the bike. Next, you need to open one of the links. Finally, tighten the chain as much as possible. It is enough to add a couple of centimeters to the resulting length so that the chain is not overstressed during driving.
Chain components
Preparation for dismantling
To make it easier to work with the chain, it is worth cleaning it first. The easiest way is to wipe it with a regular piece of material soaked in kerosene. You can also use a special wash, such as AB-80 or WD-40.
Tools
How to shorten the chain on a speed bike or mountain bike? Several tools can be used to sever links. First of all, you should pay attention to the special squeeze. The latter is a simple device resembling a manual bed with a rod, which exerts pressure on the axles (pins) of the links. You can buy such a tool at any point of sale sports equipment... Its purchase will cost from 500 to 1000 rubles.
This makes it impossible to release the link when the plates are completely located. They need to be pressed in so easily that the head can be pulled out of the insert. Just in case you haven't, the standard way to get some slack is to put the chain on the smallest sprocket in the back and also on the smallest chain in the front. Then you completely pull the chain out of the front chains so that it hangs from the frame.
If, like many of us, you intend to clean the front chains, this would be a good time to remove them, as this will allow you to pull the chain behind the lower bracket, becoming even weaker. For this I like to use a penetrating oil. You can also use a degreaser or carburetor cleaner.
If it is not possible to buy pomace, then you will have to use the means at hand. We are talking here about a hammer and a metal bar, which will serve as a punch for extracting the axes of the links. You will also need a couple of nuts that will fit under the chain links.
How to shorten a chain on a bicycle using a squeeze?
 To do the work, resorting to the operation of a special tool, you need to perform the following sequence of actions:
Old toothbrush works very well in combination with cleaning solution. Note the shape with colored arrows. Again, one hand squeezes the cymbals, the other squeezes them to unlock. Note that the fingers of the second hand will only press on one plate as shown by the arrows. If you press on the ends of both plates, they cannot move.
The sliding direction will cause the pins to move towards each other. My choice of solvent is a car brake vacuum cleaner. It cleans well, comes out of the can at a fairly high speed to blow up dirt, and it dries quickly and leaves no residue. One complete overhaul of the bike takes about 2 cans. After applying the oil, rub the chain until you rub the chain with your fingers and feel the oil. Many people think that the chain should be bold. The part of the chain that needs oil is inside, where the pins rotate the roller bearings.
- Set the squeeze to a position in which its pin will be in the center of the chain link axis.
- Perform rotational movements with the tool until the axle is almost completely out of the link.
- Disconnect the chain and, if necessary, carry out similar operations with its remaining sections.
- Remove unnecessary links and connect the structure.
Now that you've figured out how to shorten your bike chain, you need to figure out how to connect it. A narrow half-link must be inserted between the wide cheeks. Then the axle should fit completely into the bore of the hub. Next, you need to assess the mobility of the links. If it is not sufficient at the joint, the hinge can be worked out with pliers.
If you ever need to do a quick roadside repair and you lose, then get a master link in the weed by the side of the road, with a spare headroom to save you a long walk. Replacing your chain when it wears out is good preventative maintenance, just like changing the oil in your car. This extends the life of other, more expensive parts on your bike, so replacing your chain before it gets too worn is a good idea.
Before removing the chain, make sure it is correct lengthby moving to the largest front and rear sprockets. The chain should be able to make this shift with two small bends in the chain as it wraps around each shift pulley. Then move on to the smallest screws. There should be no slack in the chain and the derailleur should not move so far back that the chain itself bonds. If your old chain is the correct size, you can use it to define your new chain.
How to shorten a bicycle chain without squeezing?
 The lack of a dedicated tool for separating chain links is not critical. As mentioned above, a metal pin, a nail, etc. can serve as an alternative to squeezing. You will also need a hammer here, with which the axles will be knocked out of the links.
Slight bend on each shift pulley. The chain should not link itself. The option is to first remove the rear wheel from your bike. This will tighten the chain and make things easier. Examine the chain for a master link. The main links have a pair of unique side plates that sometimes differ in color. If you have a chain tool and your chain is worn out, you can simply ignore the master link and break the chain using the chain tool on some links from the main link.
To connect rivet chains, find a special rivet rivet in your chain. Connecting rivets will be visually different from other rivets in the chain. When choosing a rivet to break, make sure it is a few rivets from any connecting rivets already installed in the chain. Bring the chain tool drive pin into contact with the rivet and check that the chain tool pin rotates in a straight line into the rivet. Turn the handle forcibly and pull out the rivet, then remove the chain.
With this approach, the main thing is to be careful. After all, inaccurate, too strong blows can lead to deformation of the link plates. To prevent this from happening, ordinary nuts must be placed under the chain elements in advance.
For those who are first resorting to shortening a bicycle chain without using a special squeeze, it is recommended to practice first. For these purposes, it is worth using an old chain or separate, unnecessary links. Such work requires some skill. Therefore, before acting on a working chain with a hammer and a punch, you need to perform the above steps several times and evaluate the result of your own labors.
Extend the pin in a straight line. If your original chain was of an acceptable length, we will use it to modify our new chain. One of the following articles. When calibrating the original net, the line always ends with outer plates. Paste the main link for a true side-by-side comparison. It is also acceptable to line up the ends with inner plates. The important thing is to always match inside or outside to outside for accurate length comparisons. Then line up the chains, observing their rivets with a rivet, noting that the old chains will lengthen as they wear out.
Finally
So we figured out how to shorten the bike chain. As you can see, it is possible to cope with such a task not only with the help of special squeeze. To get the job done, it is sometimes enough to use the tools at hand that can be found in every home.
To effectively transfer torque from the pedals to the rear axle of the bike, the chain must be tight without slack or distortion. If, due to wear or a change in the design of the bike, it begins to dangle, spin and fall off the sprockets, even if you constantly looked after it, and when cleaning it, you can achieve good tension by removing a few extra links. To do this, it is not necessary to contact the service, since you can shorten the chain on a bicycle with your own hands at home.
Once you have them close by, simply cut the new chain to match the length of the old chain. Align the outer plates to the outer plates. Inspect chain side plates before routing the chain. Some chains are directional and any logos or block letters must be facing the mechanic from the drive end. The chain routing process is the same for both the main line and rivet chains, just make sure they are connected to the outer plates when using the rivet connecting chain.
In order to open the links, you need to prepare a special tool - a squeeze. It combines a stop that does not allow the link plates to bend in the process of pushing out the connecting pin (pin), and a screw that squeezes it out.
In sporting goods stores, you can find professional cycling tools made from durable steel grades. It can be used for a very long time, going through the transmission at least every day, and it will not break. However, in order to shorten the bike at home, a simpler version of squeezing is enough - built into cheap multitools. The reliability of this tool is lower than that of professional models, but such a squeeze is quite suitable for personal use.
Master link chains have internal plates at both ends, so you can lead to either end for chains that use a master link. Feed the chain through the rear derailleur as shown. Be aware of any tabs on the gearshift cage and guide the chain towards the right side tabs. Take the chain inside the frame through the front derailleur and connect both ends of the chain.
When connecting the circuit using a master link, check your master link for any arrows indicating the direction of travel. Secure the pliers and pull outward to secure the tie. An alternative way to connect the main line is to position the main lever on the top of the chain, apply the rear brake and apply force to the pedals. Make sure the master link is fully engaged.
Important! In addition to the tool, you should prepare rags and kerosene or WD-40 fluid to clean the gear shift system before working.
Step-by-step instruction
Answering the question "how to shorten the chain on a bicycle", it is worth remembering that all actions are performed in the following order.

The most difficult thing in this work is to make sure that the holes match, and the pin freely fits into its place. In this case, after the work carried out, it will also be necessary to adjust the speed switches.
Now we will connect the chain that uses a special rivet. The connecting rivet has a special firing that is guided by a long, tapered pilot after the rivet is fully installed. Each rivet is specific to the brand and model of the chain, so be sure to use the correct connecting rivet for your chain.
Some chains are removed by hand altogether. How this is done is shown in this video.
Lubricate the connecting rivet and install the connecting rivet from the inside of the bike towards the mechanic. Drive pin from inside the bike towards the mechanic. Turn on the chain tool and connect the connecting rivet to the chain. There will be two points of resistance as the rivet goes into the chain. The first will be that the rivet will begin to pass through the first cell of the cell. The resistance will decrease as the rivet continues to move into the chain and then unfolds again as the rivets begin to pass through the second outer plate.
Another difficulty is to determine the required chain length.... To do this, you need to shift the gear on the bike in such a way that both the front and the back of the chain lies on the largest sprocket. After that, the links open, and the part is pulled together until it stops. A mark should be made on it by adding a couple of links so that the transmission does not overextend.
Match the depths of adjacent rivets. Once it reaches the same depth, stop and make sure that your post does not protrude too far or needs to move further. If this depth looks good, you can go ahead and smash the pilot tip of the connecting rivet.
Run the driving pin of the chain tool until it contacts so that the rivet is between the anvil and the pin. Press another quarter turn on the chain tool and you're done. Now the pilot's tip has been torn, you can see a nice case for driving the pin from the inside. The debris left over from the pilot's detachment is now facing the cassettes or gears and cannot contact any part of the drivetrain, nor can it create additional noise or cause any shifting problems.
How to shorten the chain without squeezing?
If no special tool is available, you can use any sharp object small enough to push out the connecting pin. It can be a nail, an awl, or any other strong steel pin that can withstand a hammer blow. In addition, you will need a support - for example, a brick.
Burrs do not come into contact with transmission components. Reinstall the wheel and rear to inspect any tight contacts. Repair if necessary by bending the chain sideways in a narrow line. Your new chain is now installed. Once your chain is installed, if you experience any problems such as skipping, it could be a sign of a worn cassette or wheels freewheelso you may need to replace them if you've used a worn out chain for too long without replacing.
This type of master link replaces the two outer chain plates. The manufacturer supplies the product separately and with each of its new chains. Figure 3: Another type of master link. As with other links, it is not clear from the product description if it refers to reuse.

Care must be taken not to bend the chain link plates. To ensure safety, the top plate must be supported by pushing a nut or other sturdy piece of metal into the link. Most likely, the chain will have to be removed from the bike first. And for prevention, it will be possible to clean it from the rear wheel, lubricate it and install it in place.
If the master joint is too tight to remove by hand, these pliers, specially designed for gripping the rounded rollers, easily remove it. Removing or shortening a bicycle chain usually requires a chain tool, a tool that can push the pin out of the chain. Some people prefer to disassemble and reassemble wheel rims with gear shifting rather than cutting the chain, for example when changing a derailleur. Many older bicycles, without a derailleur, have a master link that can be opened with a flat head screwdriver, whereas the chains on modern shifter bikes are more likely to use a master link, such as the ones shown in the images below.
Video
If there is squeeze, the child will cope with the work; without a tool, it is much more difficult to shorten the chain on a bicycle - a video showing this process in detail will help you figure it out.
Removing an element with a lock does not take much time and effort. Today there are several varieties of this bicycle chain device, but the principle of their opening is similar. It is necessary to close the axles and remove the cover. For convenience, you can use pliers, it is also good if you have pliers on hand for opening. Thus, the whole procedure does not take much time and it will be possible to quickly remove the malfunction, change the part or remove the chain from the bike.
If there is no lock, then you need to make some effort. For work, you need a special squeeze. It is a tool with which it is very convenient and easy to extrude a pin. To work, you must position the chain link so that the release axle is directly opposite the pin. Then you need to twist the handle and squeeze out the pin itself. It is very important not to allow it to pop out, otherwise it will be very difficult to insert the pin into place correctly. Further, the bicycle chain can be replaced or repaired.
There are also some points to consider when working. For example, there was repeated removal of the same bicycle chain, then the next time it is necessary to open another link and segment, because after this process it loosens a little. Also, some models of pomace may have two seats and you need to fasten the link carefully, correctly and carefully.
Modern models of equipment have a special lock in their design, which simplifies the procedure. For some chains, you will need a special tool - a squeeze. It will provide convenience when removing excess or damaged links and will allow you to properly remove the bike chain. Removing the chain from a bicycle is difficult, although possible, without using such a device.
Design and its features

The bike chain is quite simple metal structure, which is designed to transfer the transmission from the driving sprocket to the driven one. Constituent elements:
- Outer plate;
- Inner plate;
- Pin (roller);
- Roller;
- Sleeve.
The main difference between the different types is the distance between the rollers and the width. In some modes of transport, this part may be part of the gearshift system. This detail is important and requires special attention.
A bicycle chain requires regular maintenance, cleaning and repair to function properly. Regular lubrication and flushing will ensure that the equipment works well, and every few thousand kilometers the chain must be replaced with a new one. There is also a certain indicator of the degree of elongation (0.5%), that is, pores when a new part is needed. Wear level can be determined without special measuring instruments in the following way: you need to install the element on the largest sprocket (leading) and pull it off, moving it away from the teeth. If more than 4 teeth fit into the resulting space, then the bicycle part must be urgently replaced.
Sometimes there are times when you just need to remove the bike chain. This, for example, if it is stretched and you need to dismantle one or more links. Or you just decided to thoroughly clean it of dirt (which we will do today). And it's not difficult if she has a special removable chain lock, but what to do with a chain that does not have one? Today we will look at how to remove the chain with an example.
Chain components
Before we talk about how to remove the chain, it is necessary that you understand what is at stake. For this, below, we will give an explanatory picture with the constituent elements.
We clean the chain before removing
We put the chain on the middle stars (for example, 2 - 5). We take an old dirty rag. Wrap the chain around and pedal back. It will not be possible to achieve perfect cleaning, because part of the oil and dirt is on the stars and when rotating it again adheres to the chain. Therefore, we stop pedaling and clear a small gap (10-20 cm) between the stars. This is where we will disconnect the bike chain.

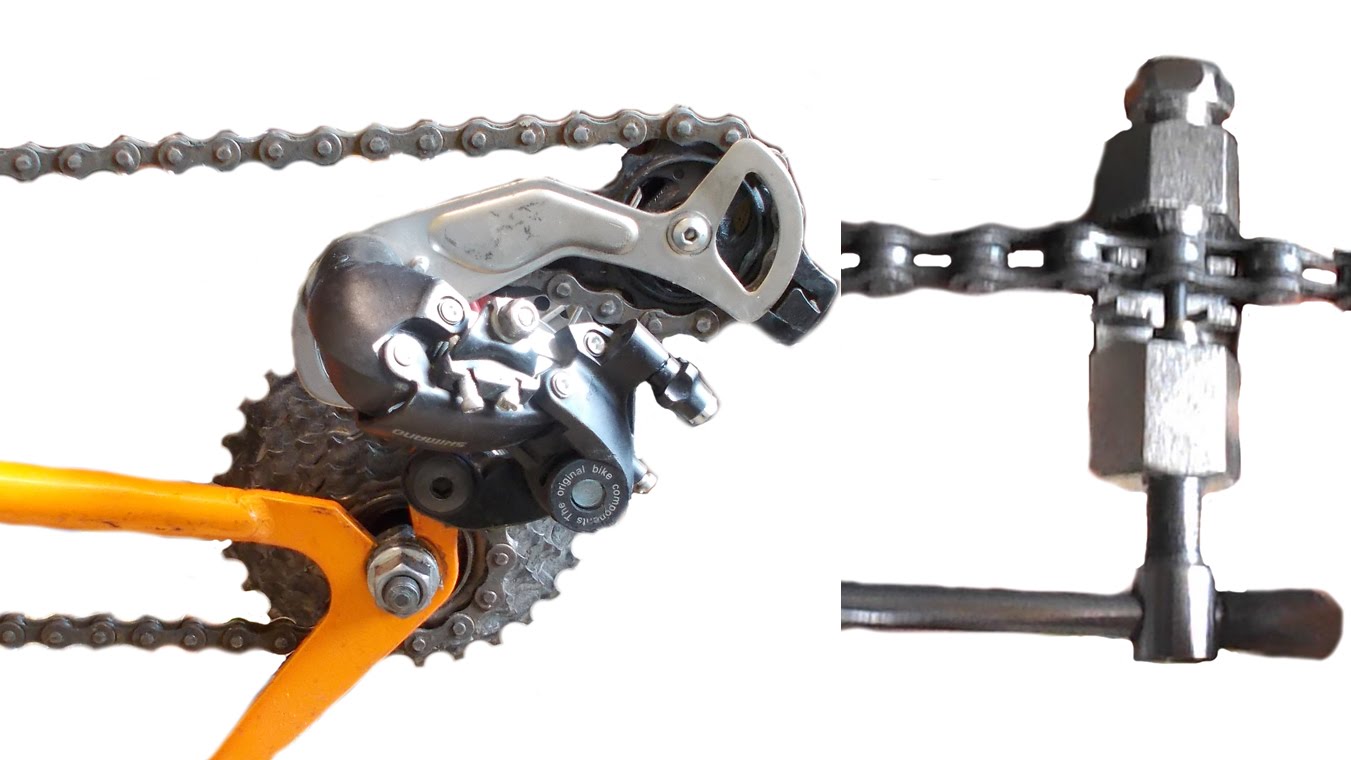
Squeeze out the pin with a squeeze
I use the cheapest squeeze chain (price about $ 4) and it does its job perfectly.

We insert the link into the grooves (as in the picture), tighten the clamping bolt (it has a spring-loaded rod in the middle, where the pin will come out) and squeeze out the pin. Care must be taken to ensure that the release rod hits the pin clearly. Do not rush and in case of failure, you should correct the chain and repeat the procedure.

After you have set everything correctly, we begin to gently rotate the handle clockwise. If you do not need to dismantle the link, but simply need to disconnect the chain, then the pin should not be squeezed out completely. Initially, there will be a tight move, then a little easier, and at the end again a tight one. At the last stage, you should slow down and act carefully so as not to squeeze out the pin completely (it will be problematic to insert it back). You can safely remove the squeeze and see how much more you need to rotate the handle.

After that, we disconnect the chain (it should be remembered that the chain is under tension, and so that it does not fly away and does not scratch your bicycle feathers, you should hold it).

Cleaning the chain, chainrings and chainrings
After you have removed the chain, you can safely apply it to various water procedures. If soap solution is used (this also includes other detergents / cleaning agents) after cleaning, it should be rinsed thoroughly with clean water. Upon completion of the cleaning stage, we send it for drying. There are no special problems with cleaning the stars either. Please note the following, if your bike has disc brakes, then the disc must first be removed from the wheel so that oil and dirt do not fly onto it when cleaning the cassette (if you do not do this, you will also have to degrease the brake disc). We wash everything with clean water and wait until it dries.
We put the chain back
We pass the chain between the rollers of the rear derailleur and do not forget about the front derailleur frame. In the picture, we will show how the bicycle chain should be positioned.

We insert the links into each other (if everything was done correctly at the disconnection stage, then the chain should hold).


After that, we inspect the junction. The pin should protrude evenly on both sides of the chain. We check the link, it should move without any effort (like everyone else). After that, all that remains is to lubricate the chain and enjoy cycling.
Conclusion
In this article, you fully learned how to remove a bicycle chain that does not have a lock. After completing all the operations, you can safely dismantle the chain without fear of wrong actions.
Keeping the bike chain in perfect condition guarantees an adequate response to the cyclist's actions from the side of the entire mechanism during movement. When buying a new vehicle, there is no need to buy a new chain separately and install it. However, in the future, you will still have to learn how to remove the chain from the bike for maintenance or replacement.
When should you change your bike chain?
A good lubrication for the bike chain can significantly increase the life of the entire system responsible for movement. At the same time, it is necessary to be able to notice the moments when it begins to need service or repair.
Excessive wear on the bike chain not only causes permanent discomfort while riding, but also causes active deformation of the sprockets. If you leave a worn-out chain unattended for a long period, this is guaranteed to lead to the need to replace a whole set of expensive mechanisms.
In order to assess its condition as objectively as possible, it is necessary to look not at the mileage, but first of all to measure the length of all its links. Normal chain length is approximately 305 mm. The reason for its replacement is its stretching up to 308 mm or more.
How to deal with chain stretching?

Sagging is a common problem with bike chains. The reason for the development of this process is the gradual wear of the links. Moreover, it is almost impossible to prevent the wear of individual chain elements. The only way to fix the problem is to remove the extra links as they stretch.
To correctly perform the required actions, you must:
- Decide how to remove the chain from the bike by first disconnecting the rear wheel.
- Disconnect the chain with pliers.
- Determine the number of unnecessary links.
- Remove unnecessary items.
- Connect the links, install the chain, check its mobility and performance.
How do I remove the chain from my bike for replacement?

When an old chain is physically and morally obsolete, not satisfying the owner of the bicycle with the operating conditions, it must be urgently replaced. As a replacement, a chain with the same number of links should be selected. However, its length should be somewhat shorter.
How to remove the chain from the bike correctly? To do this, you need to use a special tool - squeeze. With the squeeze in place against either of the rollers, tighten the screw in such a way as to push the pin out. Next, loosen the tool, and then remove. In a similar way, using a squeeze, the chain is removed for regular scheduled cleaning.
Experienced cyclists often use special locks for quick maintenance, removal and cleaning of old chains. The use of this device makes it possible to instantly remove it for replacement. However, some bicycle owners have biases about the effectiveness and reliability of the lock. Indeed, if it is present, the risk of a sudden break in the circuit increases. It is not known for certain how often the chains break when there is a lock, but still, without it, the mechanism looks more reliable.
How to tension the bike chain?

Chain tension on standard road bikes is fairly straightforward. It is enough to pull it back towards the fork. The main thing is to perform such a manipulation carefully so as not to overdo it by performing too tight a tension.
However, both tightly and loosely tensioned chain can create some discomfort while driving. So, when trying to figure out how to tension the chain on a bicycle, it is important to stop in time so that it is in a state of medium tension.
Bicycle chain tensioners
An effective and useful accessory can be a special bicycle chain tensioner, the use of which allows you to maintain the required tension while riding. This accessory is used mainly by fans of extreme, aggressive driving.
Chain tensioners are usually installed on single-speed bicycle models. Such accessories consist of one or more rollers, a lever and a spring. Tensioners work according to the principle of systematic retraction of the bicycle chain in the required direction, which creates the required tension. Moreover, the presence of the tensioner prevents the chain from falling off the drive sprocket located on the hub.
Experienced cyclists are advised to always have several chains in stock. Each of them should be operated with a knurling no more than 600 km. Then the bike chain is replaced. A new, shortest one is put in its place. As a result, the life of not only all available chains is significantly extended, but also the transmission of a two-wheel vehicle.
If you ride a bike for many kilometers, then the parts, sooner or later, will wear out. After a long run, the bike chain will "stretch" and need to be replaced.
Technically, the chain doesn't stretchbut the pins that connect the links wear out, which increases the length of the chain.
Stretched chain speeds up the wear of the cassette and the sprocket sprockets, so it's a good idea to get a new chain when the stretch is already noticeable. It is recommended to replace the chain every 1000-1500 kilometers. By the way, replacing the chain is much cheaper than replacing the cassettes or sprocket chain rings.
The chain repair and shortening information below will be very helpful.
Bicycle chain parts and necessary tools
Chain wear indicator: A typical chain wear indicator engages a pin in the chain while the other end is inserted between two pins or rollers. The numbers on the tool will show how worn out the chain is and whether it is time to change it.
New chain: The type of chain depends on the number of speeds of the bike. So, for example, if your bike is 9-speed, you need to buy a 9-speed chain. Better chains include a special coating to delay the appearance of rust, or they are already made of stainless steel.
Replacing pins or connector: New chains come immediately with a new pin or special link called a splicing link that connects the 2 ends of the chain together.
If you are repairing an existing chain, you will need to buy replacement pins or connecting links separately - they must be compatible with chain speed and brand.
Squeeze: If you have a chain with standard links, you will need a compatible squeeze to easily remove the old pin and replace with a new one when disconnecting and connecting the chain.
Pliers: If you have a chain that connects to a connector, you will need pliers to make it easier to disconnect and connect the connector.
How to check a bicycle chain

To test the chain for significant tension, use. Hook one end over a roller or pin in the chain. The other end will either come on the drive wheel by itself, or you can place it between the two rollers. If it falls out of this gap, then the chain is so stretched that it should be replaced.
The chain wear indicator has numbers to indicate the amount of chain wear. A value between 0.5 and 0.75 indicates the circuit needs to be replaced. A value of 0.75 or higher means that it is necessary not only to replace it, but also to check the condition of the cassette and drive sprockets, as stretching the chain could cause significant damage to the cassette and drive sprockets.
You can check the chain in another way - measure the chain with a ruler or tape measure. On a worn or new chain, 12 full links (measured pin to pin) should equal 12 inches (30.48 cm). If the 12 links are 31 cm or more, the chain must be replaced.
Removing the chain from a bike
To remove the chain from the bike, you need to disconnect (break) it. There are several ways to do this, depending on whether the chain has a connecting link or not. 
Before you start, slide the chain to the smallest guide sprocket and smallest prong.
Even better, remove the chain from the front sprocket or remove the rear wheel from the bike. Both of these methods will release tension from the chain.
If you have a standard chain without a connecting link: Position the squeeze so that the pin of the squeeze is aligned with the pin in the chain. Turn the wringer handle so that the pin is pulled out far enough to break the chain. 
If you have a chain with a connecting link: To find a connecting link, look for a link that is noticeably different from the others.
This is where the chain can be broken.
The connector has a pin on one side, which is inserted into a notch on the other side.
Using a pair of pliers, squeeze the connector on both sides so that it opens.
How do I determine the length of a new chain?
Usually the new chain is too long and will have to be shortened by removing the links. There are several ways to do this. The easiest and best way to determine the length of a new chain - attach it to the old chain. Then you just need to shorten it to match the old one (to be sure, you should count the number of links). 
Another variant... Pass the chain through the front derailer and drape it over the large sprocket in the front and over the large prong in the back. Do not run the chain through the rear derailer yet. Connect the two ends of the chain tightly. If the chain connects and there are still 2 whole links on the floor (half of the link still remains at the end - the place where you connect the chain), the chain length is selected correctly.
Note: Many full-suspension mountain bikes use a scheme that moves the rear axle further away from the bottom bracket while the bike is traveling through the suspension. it is called " chain growth". To adjust to the chain's growth, you will need to compress the rear suspension strongly using the method above.
Make sure the two ends of the chain will connect before removing unnecessary links. The chain can only connect if the outside of the link connects to the inside of the connecting link. Then detach the remaining links.
Fitting the bike chain
It's time to thread the chain through the rear derailer and connect it. Pay attention and make sure that the chain runs accurately through the drive wheel on the rear derailer.
Using pins: If the chain does not have a connecting link, use a squeeze to connect the chain to a pin already in the new chain.
If you are repairing an old chain, always use a new pin instead of the old one. The new pin must be compatible with the chain, its speed and brand. The new pin must be inserted halfway using a squeeze, then pull it out on the other side using pliers.
Use of connecting links: If you are connecting a chain to a connecting link, place it each half on each end of the chain, connect the ends of the chain, assemble the connecting link with a tool to put it in place.
It is also possible to connect the connecting link without tools. Connect it and pull the chain in opposite directions to block the connecting link as tightly as possible. Then loosen the clutch of the derailer, if equipped, pedal until the connecting link is on top of the drive chain. Using the brakes, step firmly on one pedal, the tension will go to the chain, and it will snap into place.
How to replace a chain on a bicycle - video
Home " Repair and maintenance " How to remove the chain using. How to shorten the chain on a bicycle: practical recommendations.